
Little magnetic needles have been pointing the way for explorers and adventurers for centuries. Despite the constant advance of technology, and many premature predictions about the demise of the classic compass, this brilliantly simple instrument, which harnesses one of the universe’s fundamental forces, is still the weapon of choice for outdoors people who want to know where they’re going.
ORIENTAL ORIENTEERING AND BJORN AGAIN GENIUS
The Chinese invented the technology that underpins the magnetic compass as long ago as 200 BC, although back then it was used as a way of divining godly direction, rather than a tool for travelling. It took another thousand years before they began employing magnetism in geographical navigation, and it wasn’t until the 13th century that compasses first appeared in the West.


Various designs have come and gone since then, but the most enduring incarnation of the modern magnetic compass was invented in Sweden. In 1932, Björn Kjellström, along with his two brothers Alvar and Alvid, and a machinist called Gunnar Tillander, developed the protractor-style compass set onto a transparent baseplate that’s instantly familiar to bushwalkers, orienteers and scouts today.
After WWII, Kjellström moved to the US, founded the company Silva around his compass, published a book (Be Expert With Map and Compass) and launched an empire. Silva still produces the most popular orienteering compasses, although companies such as Suunto are also hugely popular.
But, in an age when even smartphones and fancy-pants wristwatches come armed with GPS tracking capability and digital compasses, is it really still necessary to pack an old-school magnetic compass? For its lack of dependence on battery power and signal reception, the answer is emphatic: yes.
GPS is a great tool, and excellent for recording routes, but when you need something failsafe to get out of strife, a magnetic compass is your best mate. It’s also the lightest and cheapest option for basic navigation, and there’s simply no substitute for using a map and compass to gain a good appreciation of where you are, and where you’re heading, while out in the wilds.
LEARNING THE HARD WAY
As I write, a report has just been released by the Maine Game Warden Service in the US, which tells a truly tragic tale of a trekker on the Appalachian Trail. In 2013, 66-year-old walker Geraldine Largay went missing while doing the 3541km long-distance walk. Over two years later, when her remains were eventually discovered along with heartrending handwritten notes about her experience, it transpired that she’d briefly left the path to go to the toilet and, unable to find her way back to the track, spent 26 days hopelessly lost and alone before dying of starvation and exposure.
The case file built during Largay’s disappearance revealed that she’d left her SPOT GPS device behind in a motel, and she “has compass but does not or won’t use it.”
Even rudimentary knowledge of how to operate one simple piece of kit could have averted that awful scenario, shades of which will be all too familiar to many – me included. I once nearly died while doing Australia’s most popular multiday walk. Outside of winter, it’s hard to go wrong on Tasmania’s busy Overland Track between Cradle Valley and Lake St Clair. Once you stray off the path, though, things can go pear-shaped in dramatic – and occasionally deadly – fashion.
Hiking the Overland on my own, I decided to spend a day doing a side trip into a place called the Labyrinth (spot the clue in the name suggesting it might not be the easiest place to navigate), and wandered off without map or compass. By dusk, when I’d already spent five hours utterly lost and completely unable to find the path that had brought me into the Minotaur’s den, things were looking grim. Water and food all gone, I was ridiculously underdressed for a night out in the bush, and hadn’t seen sight nor sound of another human all day.
Eventually I clumsily free-climbed down a rock face, spied a peak that looked like it could be the Acropolis (a mountain I’d previously noted on a map as being near the hut) and followed a stream towards it. Staggeringly, this led to a path, which took me to the hut. I was very lucky. A young woman disappeared in the exact same area a few months later, and so far – over 15 years later – her body has never been found.
Lesson one: always chuck a compass into your backpack, no matter how minor your mission might seem.
Lesson two: learn how to use it – at least master the basics – and pair it with a good quality topographical map.
HOW DOES IT WORK?
The kind of compass most commonly used by outdoors people, from army personnel to weekend walkers, is a magnetic compass. This device is defined by its key component: a magnetised needle, which spins freely within a housing, with one end constantly drawn towards Earth’s magnetic north pole. The north-facing half of the needle is usually red, inscribed with an ‘N’ and has a luminous strip for navigating in the dark.
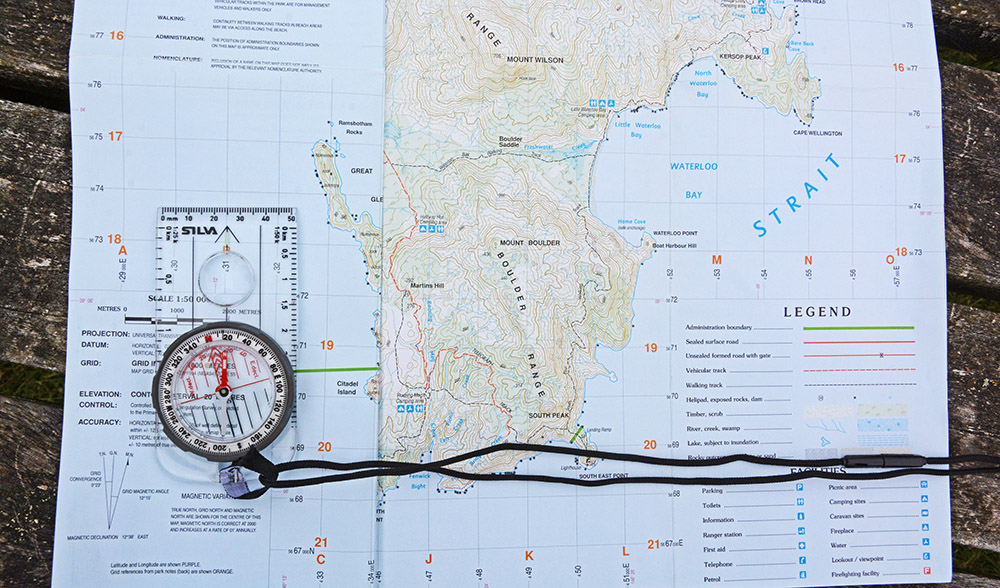
A classic protractor-style Silva compass is comprised of two elements: the ‘baseplate’, which has various features handy for map reading and wayfinding, and the ‘housing’, where all the technical magic happens.
The baseplate should be made from clear plastic, so you can clearly see the map through it, and it will have a ‘Direction of Travel Arrow’ at the top, complete with a luminous strip. Baseplates are typically inscribed with standard ruler measurements (mm) plus scale converters along the sides (showing, for example, that on a 1:50,000 map, 1cm represents 500m on the ground). Other common features include a ‘Magnifying Lens’, for looking at maps in detail, and ‘Aid Lines’ to help you set your map or take a bearing. Mounted on the baseplate is the housing, where the magnetised needle lives. The housing on a good quality magnetic compass will contain a clear fluid, which slightly dampens the movement of the needle, allowing it to settle steadily once it has a fix. This also means you can be in motion – walking, running, cycling, paddling, space hopping, whatever – without the needle skittishly twitching.
As well as containing the floating needle, the compass housing has the cardinal points of the compass rose – N (north), S (south), E (east) and W (west) – printed on a rotating circular bezel, along with graduation markers indicating degrees (0-360).
On the bottom of the housing is an ‘Orienting Arrow’, which moves when the bezel is rotated but permanently points towards ‘N’ (north) on the housing. Running parallel to this you’ll see ‘Orienting Lines’, which also rotate with the bezel and are designed to be aligned with the vertical North-South grid lines on maps. The top half of both the Orienting Arrow and the Orienting Lines are red, to indicate north.
Finally, there’s an ‘Index Line’ (or ‘Dash’), fixed on the top edge of the compass housing, beneath the rotating bezel, which aligns with the direction of travel arrow on the baseplate. This doesn’t move, so it marks the bearing set when the compass housing is rotated.
So, if you stand facing due north – with the Direction of Travel Arrow, the Index Line, the Orienting Arrow and the needle all aligned – N will be at 0 degrees on the bezel, E will be at 90, S at 180 and W at 270. If you do this whilst also aligning the orienting lines on the compass housing with the North-South grid lines on your map, then your map will be correctly ‘set’ – i.e., facing the same way as the physical terrain that is in front of you – which is always a very good thing to do at the outset of an adventure, and then again at regular intervals throughout the rest of the trip.
GETTING YOUR BEARINGS
One of the most basic compass-reading skills commonly employed by bushwalkers and orienteers is to take and follow a bearing. This can be done in three easy steps:
1) On the map, set your compass in a straight line between your current location and the place you want to travel to (e.g. a peak) – making sure the Direction of Travel Arrow is pointing towards your intended destination.
2) Keeping the compass baseplate still, rotate the bezel so the orienting lines on the compass align with the North-South gridlines on your map. The number indicated by the Dash is your bearing.
3) Take the compass off the map, hold it flat in front of your stomach with the direction of travel arrow pointing away from you, and turn until the red end of the floating needle settles exactly in the red orienting arrow on the base of the housing. You are now facing in the direction you want to go in.
MAGNETIC NUMBERS
So far, so simple, right? Well, here’s where it gets a little complicated.
Inconveniently, the Earth’s Magnetic North Pole (which your compass needle is attracted to) is not the same as ‘true north’ (the direction of a meridian of longitude which converges on the North Pole), or Grid North (the direction of a grid line which is parallel to the central meridian on the National Grid).
As a result, to accurately plot a course using a compass, especially over a long distance, you have to apply something called ‘Magnetic Variation’, or ‘Declination’. This angle is stated in the key of all good topographical maps. Simply put, if the map specifies a declination of 10° W, you subtract 10° from your bearing by turning the bezel clockwise; if specifies 10° E, you add 10° to your bearing by turning the bezel anti-clockwise (on good compasses, guides to these measurements can be seen in red on either side of the Orienting Arrow).
Even more annoyingly, the Magnetic North Pole doesn’t stay still – it hops around as the Earth’s magnetic field changes. During the last 100 years, scientists say it has shifted over 1000km towards Siberia, so the more up-to-date your map is, the more accurate the information about Magnetic Variation given will be. The per annum increase should be stated alongside the date of publication and specified declination on a map, so you can figure it out.
Lastly, because the pull direction of Earth’s magnetic field varies according to where you are on the planet (it pulls vertically at the poles, but more horizontally towards the equator), most magnetic compasses are balanced according to the part of the world they are designed to be used in. So, a magnetic compass bought in Australia will not work optimally in the UK.
For years the world has been divided into five balancing zones, with Australia and New Zealand in Zone 5. In recent years, Suunto has reduced this to two zones for its compasses, and you can also get a universal magnetic compass that works well anywhere in the world.
MAPS
In Australia, folding paper topographical maps used by bushwalkers are typically A0 size and come scaled at either 1:25,000 (1cm on the map represents 250m on the ground), 1:50,000 (1cm = 500m) or 1:100,000 (1cm = 1km).
Depending on what you’re trying to do, it’s best to get the biggest scale you can, showing the most detail. However, the wild nature of Australia’s remoter corners means that not all of the country has been mapped to the same precise degree as somewhere like the UK, where Ordnance Survey mapping is generally regarded by experts as the best in the world.
Cartography is improving all the time, however, and a proper topographical bushwalking map should clearly show structures, roads, paths, bridleways, farms and natural features including forests, rivers, lakes, hills and mountains, represented by concentric contour lines revealing specified gains in elevation until you reach the highest point.
Maps in Australia are produced using the Geocentric Datum of Australia (GDA) coordinate system, which uses the Map Grid of Australia 1994 (MGA94), a transverse Mercator projection that conforms to the internationally accepted Universal Transverse Mercator Grid system.
Got that? Good.
This basically describes how the grid system is calculated – older maps may use a superseded system, which only becomes really important if you’re quoting grid references to someone else (they’ll need to know if it’s a different system).
For this and other reasons (including topographical changes and increases in declination), its best to use the newest map you can source.